2-point protractor
Instructions
2-point protractors are universal protractors for turntable cartridge alignment that can be used with any record player (as long as the headshell slots are long enough for the chosen alignment geometry).
They are not as easy to use as linear offset and arc protractors, but knowing the exact pivot to spindle distance of your turntable or being able to see the tonearm pivot will not be necessary.
Please note that the resulting overhang and offset angle may be different from the stock specification chosen by the record player manufacturer. This is normal. Each alignment geometry will result in a different overhang and offset angle. It is not necessary to match the manufacturer’s geometry.
If you have no idea about the technical intricacies of turntable geometry, do not worry. The pre-set values should be fine for most users.
It is recommended to print the 2-point protractor onto glossy photo paper to protect your stylus. Alternatively, a piece of clear packing tape stuck onto the target points will do the trick as well. You may also laminate the cartridge alignment protractor.
Please make sure to print out the alignment template at 100 % scale (to be set in the printing dialogue of your browser or operating system). Setting print quality to “high” will help getting a good and accurate result. Measure the outer rectangle to be sure it is exactly 190 mm wide. If it is not, scale the template by changing the printer correction factor.
Safari and iOS users, please make sure to use the PDF download option to avoid scaling issues.
Cut out the protractor and make sure to punch or cut out the spindle hole as precisely as possible.
Place the alignment protractor on your turntable and set anti skating to zero.
Loosen the screws that hold the cartridge in place just enough so it can be moved, but cannot move by itself. Set the stylus precisely onto the outer grid’s center point. Lift the tonearm and adjust the cartridge’s angle until its front is parallel with the grid when lowered onto the protractor. If the cartridge front is flat, taping a pencil lead to it is highly recommended. Otherwise any error in alignment may be too difficult to see. This protractor has long horizotal lines, to which the pencil lead will have to be perfectly parallel.
Then check the cartridge alignment on the inner grid. Lift the tonearm and move the protractor to place the stylus on the inner grid’s center point. If the cartridge is at an angle here, adjust the overhang according to the following illustrations:
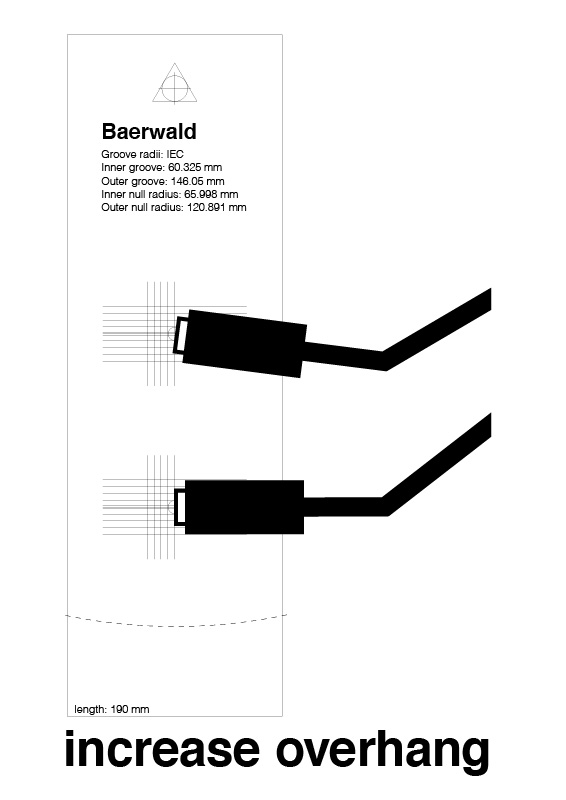
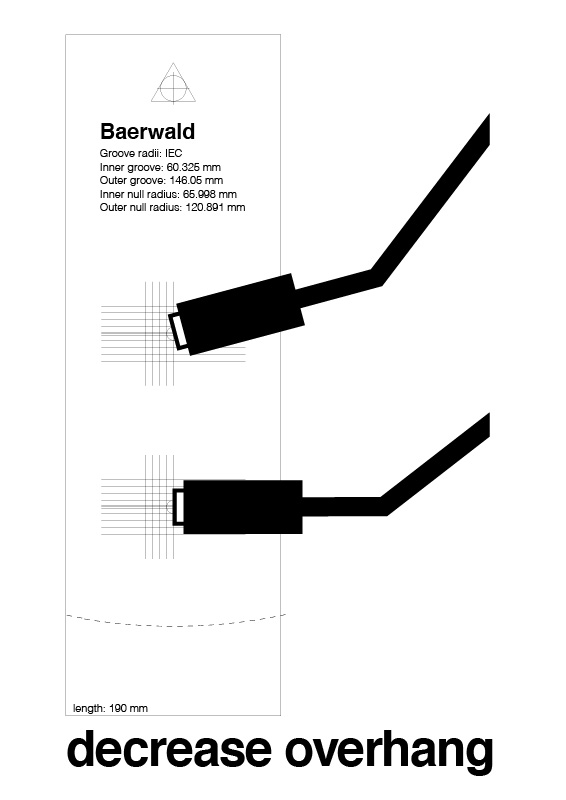
Then start again on the outer grid. Remember to only change the overhang on the inner grid and only the angle on the outer one. Repeat until the cartridge is perfectly aligned on both grids. Tighten the screws and do not forget to set the anti-skating back to the force specified for your stylus.
Some people prefer aligning the cantilever instead of the cartridge body. In some cases this may even be necessary, e.g. because the cartridge front is curved and no pencil lead can be attached or if the cantilever is not squared on the cartridge body. As the cantilever is so short, it would be impossible to find the correct overhang with just the two null points. In our experience, errors up to 0.8° may be impossible to see – and this can lead to alignment errors of several millimeters.
Please make sure to check the “overhang point” option for aligning the cantilever. Point the sightline to the tonearm pivot point and set the overhang so that the stylus reaches the point. This point is placed on the radius of the greatest tracking error. It is the spot where all effective length arcs cross, so the overhang can be set with great precision here. Once the overhang is set, move the protractor and align the stylus to one of the null points to set the offset angle.